How to Use Push Seeder for Efficient Seed Distribution?
Efficient seed distribution is crucial for successful farming. The Push Seeder is a popular tool that enhances this process. According to the USDA, proper seed placement can increase crop yields by up to 20%. This statistic underscores the importance of using effective planting methods.
Farmers often struggle with uneven seed distribution. The Push Seeder addresses this issue, allowing for uniform seed spacing. A study published in Agricultural Systems revealed that using a Push Seeder can reduce seed waste by 15%. Such data highlights the tool's efficiency in optimizing resources.
However, not all users find the Push Seeder easy to master. Some report a steep learning curve, leading to inconsistent results. It is essential to invest time in understanding the tool. Continuous practice can lead to improved outcomes. Users should consider their specific needs and adaptability before fully relying on this method for planting.
Understanding the Purpose and Benefits of a Push Seeder
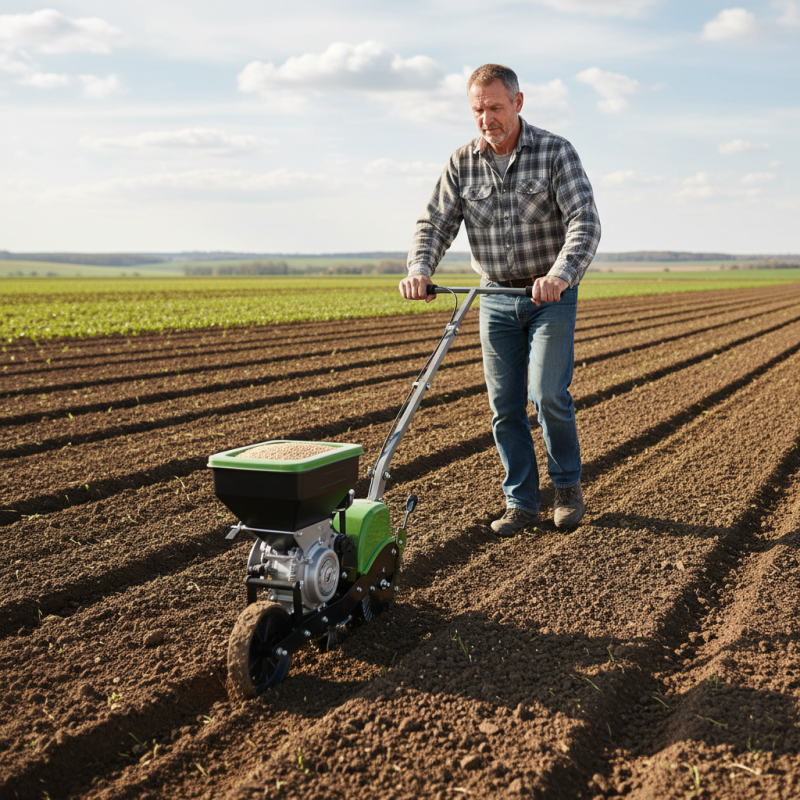
A push seeder is an invaluable tool for farmers and gardeners. It significantly improves seed distribution efficiency. This device allows for precise planting at uniform depths. Uniformity is crucial for crop success. By ensuring even spacing, plants can grow better and compete effectively for resources.
Using a push seeder reduces labor and time spent on planting. However, it requires some practice to master its handling. Some users may encounter difficulties when adjusting settings for different seed sizes. Understanding how to calibrate the machine is important to avoid wastage. Seeds that are too deep may not germinate, while those too shallow may be exposed.
Proper maintenance of the push seeder ensures longevity and reliability. Regular cleaning and checking of parts can prevent breakdowns during critical planting times. Engaging with experienced users can provide insights and tips for improvement. Like any farming tool, the push seeder can be perfected with time, experience, and reflection on usage. Each planting season presents opportunities to enhance your technique.
Types of Push Seeders and Their Features
Push seeders are increasingly popular for their efficiency in seed distribution. They come in various types, each designed to suit specific planting needs. Some push seeders have adjustable seed rates, allowing for customized planting densities. According to a recent agricultural study, using a push seeder can improve germination rates by up to 15% compared to traditional methods.
There are typically two main types of push seeders: single-disc and double-disc. Single-disc seeders excel in lighter soils and are often more compact. Meanwhile, double-disc seeders provide better seed placement accuracy in various soil conditions. Research indicates that the design of these seeders significantly impacts seed-to-soil contact, which is crucial for healthy growth. However, many users may overlook the importance of regular maintenance, which can reduce effectiveness over time.
While push seeders are efficient, they require experience to master. User error can lead to uneven seed distribution if not properly calibrated. Feedback from farmers suggests that understanding soil moisture retention is vital for optimal results. Inexperience can result in under- or over-planting. Proper training on the use of push seeders can mitigate these issues and enhance productivity in the field.
Steps for Setting Up a Push Seeder for Optimal Use
Setting up a push seeder requires attention to detail. Begin by selecting the right seeder for your needs. Ensure it matches the seed type and soil conditions. Next, prepare the soil. Clear any debris and weeds to create a smooth surface. This step is crucial for successful seeding.
After soil preparation, calibrate your push seeder. Adjust the seed rate according to the seed size. The seeder should allow for even distribution. Test it on a small area first. Check the depth of seed placement. Sometimes, adjustments may be needed. Don’t rush this process; accuracy is key.
When you start using the seeder, maintain a steady pace. Uneven walking can lead to inconsistent seed coverage. Monitor the output as you go. If you notice clumping or gaps, reevaluate your technique. Remember, practice makes perfect. There’s a learning curve involved, and reflection on your method will lead to better results over time. Adjust as necessary to improve efficiency.
How to Use Push Seeder for Efficient Seed Distribution?
| Step | Description | Time Required | Seed Type | Optimal Rate |
| 1 | Assemble the push seeder according to the manufacturer’s instructions. | 15 minutes | N/A | N/A |
| 2 | Adjust the seed depth and spacing settings for your specific crop. | 10 minutes | Various (e.g., carrots, peas) | 2-4 seeds per inch |
| 3 | Fill the seed box with the desired seeds. | 5 minutes | Depends on crop | N/A |
| 4 | Push the seeder along the designated planting rows. | Varies by field size | All row crops | Optimized for row spacing |
| 5 | Monitor seed placement and make adjustments if needed. | Ongoing | N/A | N/A |
Techniques for Even Seed Distribution with a Push Seeder
Using a push seeder can greatly improve your seed distribution efficiency. To ensure an even spread, understanding the mechanics of the tool is crucial. A properly calibrated push seeder can distribute seeds at consistent depths and spacings. This not only enhances germination but also maximizes space utilization in your garden or field.
Choosing the right seed for your push seeder is also important. Different seeds have varying sizes and weights. For smaller seeds, make sure to use the appropriate settings to avoid clogging. Adjusting the seed rate will help in achieving a uniform distribution. Pay attention to how quickly you push the seeder. Too fast can lead to uneven placements.
Visual checks are a valuable part of the process. After seeding, take a moment to assess the distribution. Look for gaps or clumps. This allows you to identify potential issues for future planting. Reflecting on the outcomes helps improve your technique over time. Embrace the learning curve as part of your gardening journey.
Maintenance Tips for Ensuring Longevity of Your Push Seeder
To ensure the longevity of your push seeder, regular maintenance is essential. This involves frequent cleaning, lubrication, and inspection of parts. Pay attention to wear and tear. A little diligence here leads to impressive results.
One important tip is to clean the seed hopper after each use. Seeds can stick and may cause future clogs. A gentle scrub with a brush and some water keeps everything flowing smoothly. Yes, it takes a bit of time, but it is worth it.
Check the wheels and axle regularly. Dust and dirt can hinder movement. Lubricate these parts to maintain efficiency. A well-oiled seeder spreads seeds evenly. Avoid letting rust build up; it can lead to bigger problems down the line. Don’t overlook the value of storing your seeder in a dry place to prevent moisture damage.